Saturday, October 24, 2015

Holloway's Sideshow Carnival Party

SIDESHOW CARNIVAL PARTY

This October, Holloways had their second annual Costumes and Cocktails Party themed, "Sideshow Carnival".  Last year, we did a Hitchcock theme and this year spiced it up with something a little freakier!

We invite all of our employees and their spouses/significant others and encourage everyone to dress up by giving away a prize for best costume.  Everyone at the party votes for the winner.  We also do a Yankee grab bag but we provide all of the prizes.  We set the mood with themed music, amazing decorations, and food to compliment the theme.

Keep on scrolling to see how we put together our Sideshow Carnival Party!


Here is the invitation I put together in Photoshop!  I got the idea from googling carnival poster images and then replicated it the best I could.  I was able to download free carnival and circus style fonts for a more authentic look and printed it on Gold Parchment style paper.


DECORATIONS

There are four main areas in my house where the guests mingle and I decorate them differently.  The dining room is where we serve all of the food, the kitchen nook held the desserts,  the family room housed the carnival tent, and the living room held the fortune teller tent.

In the formal living room, I created a Fortune Teller's Tent. 


This is how I created the TENT: I borrowed a Coleman popup tent (commonly used at soccer and lacrosse games) from a friend.  We have high ceilings in our living room so it fit just fine.  I bought fabric from FabricDirect.com.  They had cheap gold mirrored fabric for $1.49/yard and a some light weight red fabric from FabricMart.com for $1.29/yard.  15 Yards of Gold and 10 Yards of Red worked out perfect.  I used large safety pins to pin it around the structure of the canopy to give it a rich, flowing look.  I thought I would need to cover the top of the tent, but no could really see it anyway.  Then I draped some old sheer curtains around the two back sides for a nice effect.

With various side tables and chairs, I set up three seating areas under the tent which look cool and were used to eat at and chat.

This is how I created the fortune teller: Why re-create the wheel when there are other talented people out there sharing their info?  I found this link on Pinterest on how to create a fortune teller.
The only things I did different was use ping pong balls instead of rocks in the bucket (that kept the Fortune Teller lady standing up). Also,  I happened to have a salt stone globe.  My husband was able to shore up the table part with wood scraps so it could handle the weight of the globe.


I added fish fortunes which I found on Amazon.com.  Here is the link to the fishy fortunes.  You lay the fish in your hand and the movements are assigned a fortune on the wrapper.


In the family room I created the Carnival Tent:


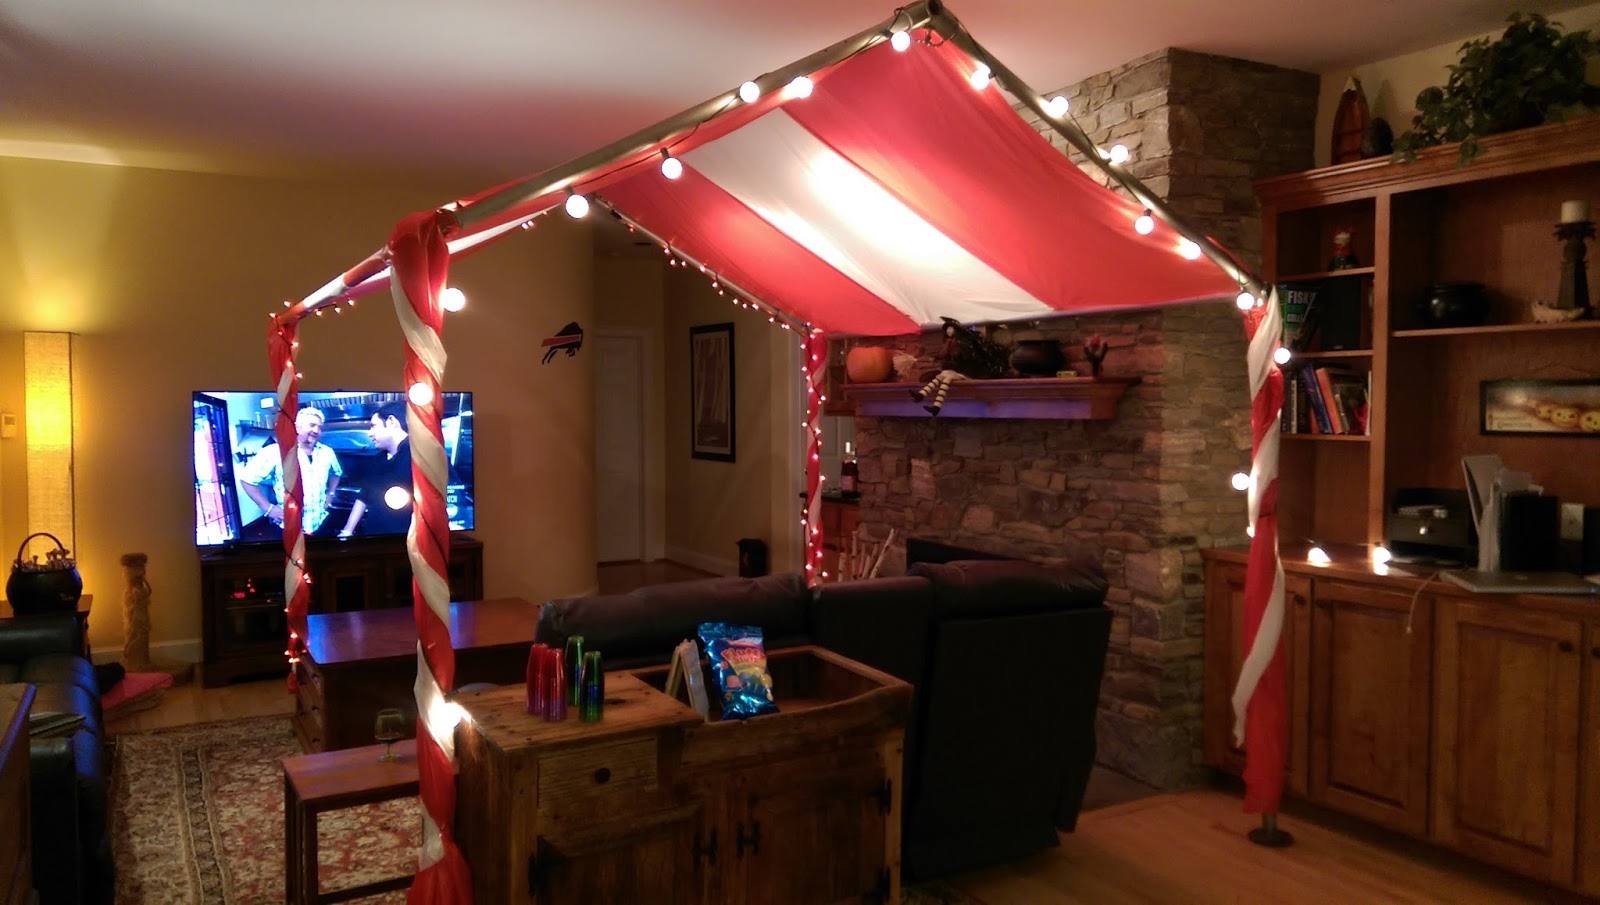
 Connecticut Party Rentals hooked us up with the tent pole structure.  The didn't have a red and white tent canopy, so I created one with red and white plastic table clothes.  You can buy them in 100 ft rolls, which was more than enough.  We secured the tent up against the fireplace.

In the kitchen nook I displayed the SideShow Posters:


This is how I created the Sideshow Poster: I went to Google Images, and searched for "sideshow posters".  At the top of the screen, there is a button called "Search Tools". You can click that and then select your search to pull up images that are a certain size.  I chose to search for posters larger than 1024x768. This was a good enough resolution to create a large poster.  I downloaded them and then uploaded them to Staples.com and had them print the posters on vinyl.


Party Menu:
The entire menu were all foods you could find at a carnival.

  • Hot Dog Bar - I put out ramekins with all the fixings with a hotdog bar sign I created and printed at Staples
  • Roasted Turkey Legs - Ordered 12 from the local butcher and roasted earlier in the day
  • Soft Pretzels - Super Pretzels in the frozen section of the grocer. 
  • Deep Fried Pickles - I found a deep fried pickle recipe, but dipped the batter in panko bread crumbs before frying.  PANKO IS A MUST or they won't be crispy.   I made them earlier in the day, then heated them in the oven before serving.
  • Deep Fried Mac and Cheese Bites - Make a basic macaroni and cheese recipe from scratch.  Don't bake it and put in the fridge for 4 hours to set.  Then cut into bites sized squares, dip in egg wash, dredge in breadcrumbs and fry.  These can be made earlier in the day and heated up with the pickles.
  • French Fries with Cheese Sauce - Buy our favorite oven back fries.  This link has a really easy recipe for cheese sauce without the chemicals of manufacturer made.
  • Chocolate Covered Bacon - Thread raw bacon on skewers.  Lay them single layered and flat on a jelly pan and bake in the oven until crispy.  Make sure they are not fatty.  After cooling, dip in a chocolate dipping sauce.  The best option is to melt chocolate chips in a double boiler and add some edible paraffin to thin out.  The paraffin sets up nice in the chocolate so it isn't soft.  If you just thin the chocolate with vegetable oil, like some recipes suggest, the chocolate never quite firms up.
  • Chocolate Covered Rice Crispies - Buy or make rice crispy treats.  Dip in the chocolate made for the bacon and sprinkle with multi-colored sprinkles.
  • Multi-flavored Popcorn - I found these at Costco online!  


Music:
I found some creepy circus music on YouTube that is a full hour of music.  Here is the link. I was able to find an app on my Android phone that loops youtube videos/music.  I hooked my phone up the our speakers and had themed music for the evening.  Make sure you keep your phone plugged into power or it will go dead like mine did.  Oops!  

Party Prizes:
We did one fun game that is just like a Yankee Grab Bag where everyone brings a gift to swap, but I bought all the gifts.  I bought 13 items that were all related to sideshow acts.  I wrapped each prize, and affixed a picture of the sideshow act to the outside to act as a clue.  


During the party, I made sure everyone put their name on a piece of paper and put into a bowl.  After eating, we called everyone together to explain the rules of the game:

1.  If I draw a your name from the bowl, come up, pick a prize, and open it. It is yours to keep for now.

2.  The next name I draw gets to steal an opened gift from the previous people OR pick a wrapped gift.  If they steal an opened gift, the person it was taken from gets to pick, again, from the wrapped gifts.

This goes on until all the prizes are taken.  It is great fun when the gifts get stolen!  Make sure everyone that gets picked stays in the front of the room so everyone can see the prizes.


These where the prizes by sideshow act:


  • Bearded Lady - Beardo hat from www.beardo.com
  • Strong Man - Ropeless jump rope
  • Tattoo'd Lady - Tattoo sleeves
  • Sword swallower - Knife sharpener
  • Master of Ceremonies - Coney Island Hard Root Beer with mustaches
  • Fire Eater - Fireworks
  • Siamese twins - "Twin" pack portable wine bottles
  • Fat Lady - Halloween Candy
  • Mermaid Man - Basket of edible seaweed, Goldfish crackers, tuna, sardines
  • Human skeleton - Milk Bones dog biscuits
  • Frog Boy - Frog Parking Only sign
  • Fortune Teller - Wheel of Fortune board game
  • Lady with Apple on head (I had to stretch for this one) - Apple TV


BEST COSTUME PRIZE
Lastly, we had everyone vote anonymously for the best costume.  The prize was 4 tickets to the Ringling Brothers Barnum and Bailey Circus!


The Winner - Lion and the Lion Tamer!


ENJOY THE SHOW!


Wednesday, March 25, 2015

Make Up Air?


Are you remodeling your kitchen or building a new home?  Have you heard the words, "Make Up Air"? In homes that have hoods over 400 CFM (cubic feet per minute) it is recommended that a make up air system that is equal to the exhaust rate be in place.  This code has been in place since 2009, but many inspectors are just beginning to enforce it now.

The reason behind this code is that most new homes are air tight.  When you turn the hood on in an older (draftier) home, there is plenty of fresh air that comes in through various places throughout the home.  But this doesn't happen in a "green", "passive" or "tight" home.  So the way to get fresh air to come in to your home is through a make up air system.  Please note that this code is applicable for both new and remodeled homes.  There are a couple ways to incorporate make up air into your home.  Talk to your contractor or building inspector to learn more, but in the meantime, check out this video from Broan.  


Monday, April 7, 2014

Steam Dryers

Have you  ever wondered if steam dryers are really worth all the hype?  If you have a busy family, (and who doesn't?) I think they are definitely worth it!  Here is the low down:

First let me answer the question, what is a steam dryer?  A steam dryer is a dryer that is hooked up to a water line.  On certain cycles, a small amount of water is injected into the dryer to create a "steamy" environment.  This steam helps release wrinkles and can also remove odors.  The steam is not used on a regular drying cycle.

Aren't you always this happy when you do the laundry?
I have two young children so that means that laundry is done on an hourly basis in my house.  All kidding aside, my family has a lot of laundry so finding time to wash, dry, fold, and put away is sometimes a daunting task.  And the ironing?  No Way!  So, what do we do when something sits in the dryer a little too long?  Or that shirt I want to wear really should be ironed but there is no time?  We use our steam dryer!  I like to use the short setting to freshen up one or two pieces that I want to wear that day and the longer setting if I have a bunch of clothes that need a de-wrinkle.  I know a lot of brands state that the steam dryers can remove smells and set in odors.  Personally, if something is that smelly-I just rewash it.  I don't find that to be the reason to purchase a steam dryer.  But maybe you can see a benefit to this.

Now, I know a lot of you just use that wash cloth trick that your first roomate taught you, but I promise the steam dryer is much easier.  For those of you who have no clue what I am talking about, here is a quick tutorial:

Step 1: Place wrinkled item in regular dryer
Step 2: Place wet wash cloth in with wrinkled clothing
Step 3: Set dryer for auto dry
Step 4: Take clothing out of dryer and TA DA!  You have a wrinkle free article of clothing. (kinda)
Yup, that's right!  I use a baby wash cloth.


Why on earth did I just tell you this trick?  Isn't that silly?  Now none of you will want a steam dryer, right? WRONG!  I am telling you steam dryers are really quite affordable.  Steam dryers start around $599.95.  So, they really aren't anymore expensive than most regular dryers.  And this way, you don't have to use wash cloths and it works much better.

They are easy to set up, easy to use and extremely helpful for all you busy people out there who hate to iron.  I know I can't be the only one, right?

If you are interested in a steam dryer, stop in to Holloways Appliance Center and ask for any one of our amazing sales people to walk you through the steam dryers.

Best,
Laurie

Holloways Appliance Center serves all of Connecticut (including West Hartford, Glastonbury, Bloomfield, Avon, Canton and many more) and Western Massachusetts (including East Longmeadow, Westfield, Southwick, Granville and many more).

Wednesday, March 19, 2014

Making Baby Food-Apple Spinach Sauce

Blog by Laurie of Holloways Appliance Center

I really enjoy making baby food.  If you have never tried it, it is super easy and you usually can make a lot of it for very little money.  Here are the basic steps I use to make apple sauce.  Now I occasionally like to be sneaky and stick in something super healthy, so today, this recipe is for Apple Spinach Sauce.  I used 4 large organic apples and one package of organic baby spinach.  When I make this again, I am going to double the apples to 8 for a sweeter more aromatic sauce.

This is really all you need to make baby food

Step 1:  Wash the apples and spinach

Step 2: Peel the apples (this isn't necessary but I prefer to do this)

Step 3: Steam the fruit and vegetable.

  • There are A LOT of ways to steam your food.  There are those cool baby gadgets that let you steam and puree all in one appliance.
  • When I am home, I just steam using a pot of water and a steaming basket.
  • For this food, I was in the Holloway's showroom so I used a Convection Steam Oven.  These ovens are so cool! I'm not sure I would buy one JUST for baby food but these ovens are amazing.  I will be sure to write a post on these in the near future!
I just put the peeled apples and spinach in the same tray and steamed them in the convection steam oven.

Step 4:  Once the food is nice and soft, place it in the food processor and puree.  For this recipe, I used the KitchenAid 13 cup Food Processor in RED!  I love this thing.  (Shameless plug - you can buy them at Holloways!)

A Yummy Green Mixture
Step 5: Check out the consistency and add enough water to make your baby happy.  

My son liked really watery baby food but my daughter prefers her food much thicker so I barely added any water to this recipe at all.  Remember you can always add some cereal if it gets really watery.  I had to do that with carrots once because I basically made the baby food into orange water.  I didn't want to waste it, so I just used it to combine with some baby oatmeal.  She loved it...but my daughter isn't too picky in the food department.

Step 6: Freeze the extra!

This makes a lot of food and my kiddos can never eat that much so I freeze the remaining amount.  I do this in a two step process.  I first place as much as I can in these little containers.  They can go in the refrigerator or the freezer.  After that, I place the remaining in ice cube trays.  Once the baby food is frozen, I pop the little cubes out and put them in freezer bags.  (FYI-Each cube is about one ounce.)

I got these little jars at Target...I forget the brand name though.
I will be posting some baby food recipes from time to time, but we would love to hear your recipes too. What food have you made for your little ones?

Here's my little guy eating some homemade baby food.  


Holloways Appliance Center serves all of Connecticut (including West Hartford, Glastonbury, Bloomfield, and many more) and Western Massachusetts.


Friday, February 21, 2014

Five Ingedient, Cheesy No Knead Bread

By guest blogger Faye Scheren

I am addicted to this bread, and it is so, so easy.  This yeast bread requires absolutely NO KNEADING.  It takes a couple minutes to chop the cheese and stir together the dough. Then, just let it sit overnight and bake it the next day in perfect time for your evening dinner.  I hope you enjoy this Easy-Peazy bread recipe.

~Faye

Cheesy No Knead Bread


Basically, there are only three steps:


Mix all the ingredients

Put dough on counter to rest

Bake the dough


Ok, for you perfectionists out there, here are the details...


Ingredients:

3 1/2 cups of bread flour (or all purpose flour)
1 1/2 teaspoons salt
¾ teaspoon of Rapid-rise yeast
1 1/2 cups water
1 1/4 cups cheddar cheese, chopped medium


In a large mixing bowl, combine flour, salt, and yeast.  Add water and mix until a shaggy mixture forms. 

Coarsely chop the cheese.
Add chopped cheese and combine.  


Mix all the ingredients with the cheese.

Cover bowl with plastic wrap. 


Cover the wet mixture with plastic wrap and leave on counter overnight.


Put aside on the counter for 12 – 18 hours (even up to 24 hours).  Overnight works great!


After resting for 12-18 hours, the dough will be wet and sticky looking.  This may not be what you expect, but that means it is PERFECT for baking!


The dough will look wet and sticky.


Pre-heat the oven to 450 degrees.  


When oven has reached 450, place a cast iron pot with a lid in the oven and heat the pot for 30 minutes.  (You can find economical cast iron pots by Lodge, and more expensive enamel coated ones by Le Creuset.  There are several other brands out there as well.)

While the pot is heating, dump the dough onto a heavily floured surface and shape into a ball.  DO NOT KNEAD!  Just shape it gently, brushing the flour over the dough so it does not stick to your hands or to the counter top.  Cover with plastic wrap and let rest.  


Remove hot pot from oven and drop in the dough.  No need to grease the pot, the bread will not stick – trust me!


Cover with the lid and return to oven for 30 minutes.  


After 30 minutes, remove the lid and bake for an additional 15 minutes. 


 Remove bread from pot and place on a rack to cool. 


There you have it! The crunchy outside and soft inside of an artisan bread, but done with no kneading in your own oven. Enjoy!


Holloways Appliance Center serves all of Connecticut including Avon, Canton, West Hartford, Glastonbury, Farmington, Windsor and western Massachusetts.